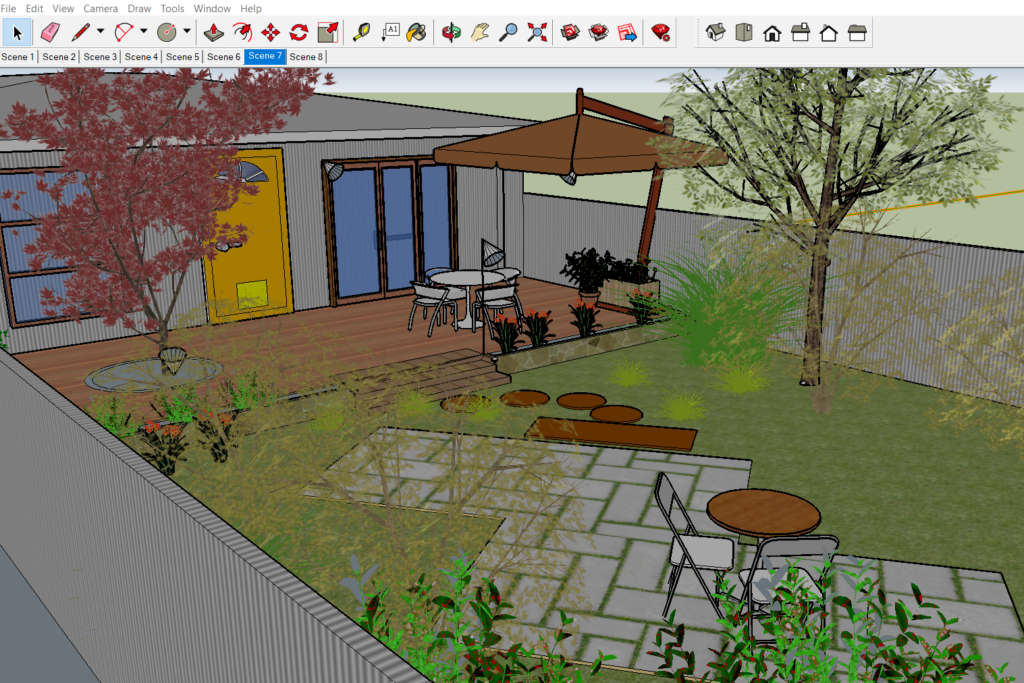
Show clients a photo-realistic impression of your design by exporting an image file from gCADPlus to SketchUp, and building a 3D model. Lets’ show you how.

What can be achieved?
![]() 3D modelling landscape designs. We export a JPG file from our landscape software making sure that the image file has close to 10,000 pixels across. The image is then loaded into SketchUp and scaled such that the image is full size. We then place SketchUp entities on top of the image file (that’s on its own layer) and push/pulled to create the model.
3D modelling landscape designs. We export a JPG file from our landscape software making sure that the image file has close to 10,000 pixels across. The image is then loaded into SketchUp and scaled such that the image is full size. We then place SketchUp entities on top of the image file (that’s on its own layer) and push/pulled to create the model.
This gallery shows some images of gCADPlus designs moved to SketchUp as image files and 3D models developed.
Some movies showing some of the issues involved
![]() This movie provides an overview of the steps to take in order to create a SketchUp model of a gCADPlus design.
This movie provides an overview of the steps to take in order to create a SketchUp model of a gCADPlus design.
![]() If you intend to build a 3D model in SketchUp based on an image file exported from gCADPlus it’s a good idea to scale the image.
If you intend to build a 3D model in SketchUp based on an image file exported from gCADPlus it’s a good idea to scale the image.
![]() Make a SketchUp model of a fire pit.
Make a SketchUp model of a fire pit.
![]() Develop a full SketchUp landscape presentation based on a exported image file from a gCADPlus design.
Develop a full SketchUp landscape presentation based on a exported image file from a gCADPlus design.
![]() Tip: In SketchUp, work on individual components. Move to a layer when the shape takes on 3D.
Tip: In SketchUp, work on individual components. Move to a layer when the shape takes on 3D.
![]() Use elevation data to help build SketchUp models – case study #1, part 1.
Use elevation data to help build SketchUp models – case study #1, part 1.
![]() Add materials to a model – case study #1, part 2.
Add materials to a model – case study #1, part 2.
![]() Once a design created in gCADPlus has been ported to the SketchUp environment and the model built, it is possible to create several scenes and finally export an animation.
Once a design created in gCADPlus has been ported to the SketchUp environment and the model built, it is possible to create several scenes and finally export an animation.
![]() High quality rendering with the Kerkythea plug-in. Assign materials, place plant symbols and export from SketchUp to Kerkythea.
High quality rendering with the Kerkythea plug-in. Assign materials, place plant symbols and export from SketchUp to Kerkythea.
![]() A gCADPlus user was faced with a ‘ Group Code’ error when exporting a gCADPlus design to SketchUp. The base for the drawing came from an architect who was working in AutoCAD 2019. We show that by switching off some layers, copying just the information needed into a new gCADPlus drawing it was possible to overcome the group code error and get the required data to SketchUp ready to build a landscape model.
A gCADPlus user was faced with a ‘ Group Code’ error when exporting a gCADPlus design to SketchUp. The base for the drawing came from an architect who was working in AutoCAD 2019. We show that by switching off some layers, copying just the information needed into a new gCADPlus drawing it was possible to overcome the group code error and get the required data to SketchUp ready to build a landscape model.
![]() Tip: The database describing SketchUp models differs markedly from those 3-D models created in applications such as AutoCAD and MicroStation. These CAD tools use a complex mix of Coons patches, ruled surfaces, surfaces of revolution and so on to describe their 3D model. SketchUp has a much cleaner and faster method of recording the model geometry than other CAD tools because it uses triangular meshes to describe the model. As a result, SketchUp can be used effectively on quite modest computer equipment.
Tip: The database describing SketchUp models differs markedly from those 3-D models created in applications such as AutoCAD and MicroStation. These CAD tools use a complex mix of Coons patches, ruled surfaces, surfaces of revolution and so on to describe their 3D model. SketchUp has a much cleaner and faster method of recording the model geometry than other CAD tools because it uses triangular meshes to describe the model. As a result, SketchUp can be used effectively on quite modest computer equipment.
Step 1. Export a suitable image file from gCADPlus
We recommend printing your design to a PDF writer such as CutePDF or BullZip, open the resultant PDF in Acrobat Reader, set the view to Full Screen Mode (Control + L is the shortcut) and copy a screen grab to the clipboard. once that’s done, paste the clipboard contents into IrfanView and save the resultant file as a png image file. An example is shown below. The image was 1500 pixels wide.

Start SketchUp
The next step is to start SketchUp, choose an appropriate template (units mm or decimal feet) and import the image. Here is the above image pasted into SketchUp.

Scale image
Now use the measure tool to scale the drawing appropriately.
![]() How to scale the image in SketchUp.
How to scale the image in SketchUp.
Save the SketchUp file and start a new SketchUp file. As shown in the YouTube movie below, create the model based on the image file exported from gCADPlus.
How to configure SketchUp (Make) ready for model creation
We will enhance SketchUp by adding some tools to to enable smooth model building.
Start SketchUp and add the following PlugIns to SketchUp:
- Weld (automatically adds the Weld Setting plugin)
- Path copy
- Sandbox
- Sandbox bonus tools (https://www.youtube.com/watch?v=r_5vjgPw1Pc)
Configure a SketchUp template
Make a template suitable for your units – either mm or decimal feet for the US Imperial environment.
Add components (vegetable area, furniture, low poly 3D plants etc.)
Window > make sure that the Default tray is showing.
Need to make sure that layers show.
Move the image to layer image.
Notes
![]() We first experimented by using Tools > Export raster generating jpg, bmp or png files. Using the maximum resolution possible in the gCADPlus tool did not produce an image of sufficient resolution suitable for model building in SketchUp.
We first experimented by using Tools > Export raster generating jpg, bmp or png files. Using the maximum resolution possible in the gCADPlus tool did not produce an image of sufficient resolution suitable for model building in SketchUp.
Here is an example of the use of the rasterize option. The maximum resolution allowed in gCADPlus rasterize is 10,000 pixels wide

Here is the image in SketchUp Make. The image is not crisp enough to work with.

The result is much better when the drawing is printed to PDF and a screen grab made of a full screen view.

Now in SketchUp

Build 3D geometry

